
8-Bit Challenge - Creating 8-bit pixel artwork using touchdevelop
In this lesson, students create 8-bit artwork using touchdevelop and learn how a computer represents an image using binary.
In this lesson, students create 8-bit artwork using touchdevelop and learn how a computer represents an image using binary.
Suggested time: 100 mins
Learning Objectives:
Curriculum Mapping:
KS2:
KS3:
What you will need:
Learning Objectives:
- Create 8-bit pixel artwork using touchdevelop
- Explain the representation of an image as a series of pixels represented in binary
- Explain the need for metadata to be included in the file such as height, width and colour depth
- Discuss the effect of colour depth and resolution on the size of an image file
Curriculum Mapping:
KS2:
- Design, write and debug programs that accomplish specific goals; solve problems by breaking them into smaller parts. Select, use and combine a variety of software on a range of digital devices to design and create a range of programs.
- Use sequence, selection and repetition in programs; work with variables and various forms of input and output
- Use logical reasoning to explain how some simple algorithms work; detect and correct errors in algorithms and programs
KS3:
- Use two or more programming languages, at least one of which is textual, to solve a variety of computational problems.
- Make appropriate use of data structures [for example, lists, tables or arrays]; design and develop modular programs that use procedures or functions
- Understand how data of various types (including text, sounds and pictures) can be represented and manipulated digitally, in the form of binary digits
What you will need:
- Web enabled device (PC, Tablet, Phone) with an up-to-date browser (Internet Explorer, Safari, Chrome)
- TouchDevelop Web App (www.touchdevelop.com)
Introduction:
Data in computers is stored and transmitted as a series of ones and zeros (also known as Binary).
To store an image on a computer, the image is broken down into tiny elements called pixels. A pixel (short for picture element) represents one colour. An image with a resolution of 1024 by 798 pixels has 1024 x 798 pixels (817,152 pixels).
In order for the computer to store the image, each pixel is represented by a binary value. We call this representation of colours a “bit-plane”. Each bit doubles the number of available colours i.e. 1-bit would give us 2 colours, 2-bits would give us 4 colours and 3-bits would give us 8 colours etc.
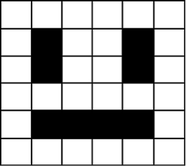
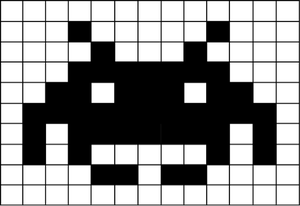
In a monochrome (two colour) image, like the example below, just 1 bit is needed to represent each pixel e.g. 0 for white and 1 for black.
Data in computers is stored and transmitted as a series of ones and zeros (also known as Binary).
To store an image on a computer, the image is broken down into tiny elements called pixels. A pixel (short for picture element) represents one colour. An image with a resolution of 1024 by 798 pixels has 1024 x 798 pixels (817,152 pixels).
In order for the computer to store the image, each pixel is represented by a binary value. We call this representation of colours a “bit-plane”. Each bit doubles the number of available colours i.e. 1-bit would give us 2 colours, 2-bits would give us 4 colours and 3-bits would give us 8 colours etc.
In a monochrome (two colour) image, like the example below, just 1 bit is needed to represent each pixel e.g. 0 for white and 1 for black.
Images are stored in scan lines. Each line is encoded from left to right, top to bottom. The image here would receive the following binary values:
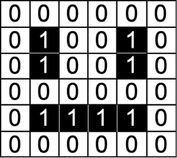
000000
010010
010010
000000
011110
000000
010010
010010
000000
011110
000000
In an image that uses 4 colours, 2 bits are needed for each pixel. The following example uses two bits to store the following colours:
00 – White; 01 – Black; 10 – Yellow; 11 – Blue
00 – White; 01 – Black; 10 – Yellow; 11 – Blue
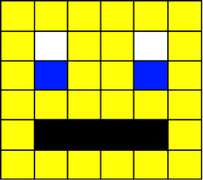
The image here would receive the following binary values:
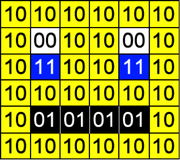
101010101010
100010100010
101110101110
101010101010
100101010110
101010101010
100010100010
101110101110
101010101010
100101010110
101010101010
In order for the computer to interpret the image, the computer needs to know the following:
We call this extra piece of information “metadata”.
Want to know more?
To find out more about how a computer represents an image using binary, click on the links below:
- Colour depth – how many bits represent each pixel
- Resolution - Width & Height (in pixels)
We call this extra piece of information “metadata”.
Want to know more?
To find out more about how a computer represents an image using binary, click on the links below:
- GCSE Computing revision (Binary image representation) - http://mattg99.wordpress.com/2011/05/21/gcse-computing-revision-binary-image-representation/
- CS Unplugged (Image representation) http://csunplugged.org/image-representation
- BBC: Cracking the code (How pictures can be represented in the form of binary) - http://www.bbc.co.uk/programmes/p0166rgs
Lesson Outline:
In this lesson, students create 8-bit artwork using touchdevelop and learn how a computer represents an image using binary.
Activity 1:
Direct students to the link below and ask students to follow the instructions:
In this lesson, students create 8-bit artwork using touchdevelop and learn how a computer represents an image using binary.
Activity 1:
Direct students to the link below and ask students to follow the instructions:
Tutorial:
Step-by-step tutorial (Opens directly inside touchdevelop):
8-Bit Pixel Art Tutorial (step-by-step tutorial)
Step-by-step tutorial (Opens directly inside touchdevelop):
8-Bit Pixel Art Tutorial (step-by-step tutorial)
Worksheet:
| pixel_art_tutorial.docx |
Activity 2:
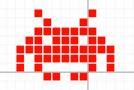
Once the students have completed the tutorial, challenge them to create their own 8-bit pixel artwork using the template below.
8-Bit Pixel Art Template
Tip: If students are struggling for inspiration, ask them to check out these great examples: Pixel Art Showcase
Activity 3
Explain to students that data in computers is stored and transmitted as a series of ones and zeros, also referred to as “Binary”.
Display the following simple 1-bit image on the board and ask students to suggest how it could be converted to binary. Try to draw out answers such as "Use 0 to represent white and 1 to represent black" or "Use 0 to represent black and 1 to represent white".
Explain to students that, in a computer, an image is broken down into tiny elements called pixels and that each pixel (short for picture element) represents one colour. Explain that an image with a resolution of 1024 by 798 pixels has 1024 x 798 pixels (817,152 pixels).
Tell students that, in order for the computer to store the image, each pixel is represented by a binary value (One or Zero). Explain that we call this representation of colours a “bit-plane” and that each bit doubles the number of available colours i.e. 1-bit would give us 2 colours, 2-bits would give us 4 colours and 3-bits would give us 8 colours etc.
Demonstrate this using the 2 colour and 4 colour images in the introduction (above).
After showing students how a computer would represent a 2 colour and 4 colour image, ask the students to suggest how we could store more colours such as 16, 256 etc.
Explain to students that an image represented by 24-bits would have 16 million colours - 16,777,216 to be precise.
Finally, hand out the following worksheets and ask the students to copy the image they created in touchdevelop onto the grids provided. Once the students have transferred their images tn their worksheets, instruct the students to convert their image into binary (as if they were a computer).
Worksheets:
| bitmaps-blank.pdf |
| bitmaps-large.pdf |
| bin2hex.pdf |
Extension:
- Students can share the binary code of their favourite bitmap image with a classmate to see if they could convert it back to the original image.
- Some students can convert their image to hexadecimal (using the help sheets provided)
Activity 4
Write the following binary example on the board and ask the students how the computer would interpret the numbers.
101001001001101
Note: You can write any binary number on the board - the idea being for the students to ask questions such as how many colours etc.)
Ask students what does a computer need to know to be able to convert the image. Explain that, in order for the computer to interpret the file, the computer needs to know:
• Colour depth – how many bits represent each pixel
• Resolution - Width & Height (in pixels)
Finally, explain that we call this “metadata”
Plenary:
Finish by recapping the learning objectives using the Pose, Pause, Pounce and Bounce method.
Example:
Pose a question to the whole class e.g. Explain how a 16 colour image can be represented in binary
Pause to give students time to digest the question and think of their answer. If the students are engaged, try holding the pause for a little while longer to build up the tension.
Pounce: Quickly, select a student to answer the question. i.e. Insist the answer to the question comes from student A and possibly student B, directly and fast! Obviously, plan in your mind who you are going to direct the questions to before hand.
Bounce the question or student's response on to another student (immediately after the pounce). e.g. Ask them if they agree with the students previous answer and to explain why.
For more information about the Pose, Pause, Pounce and Bounce technique, visit: @teachertoolkit - http://teachertoolkit.me/2013/01/04/pppb-version2/
Homework:
Students can continue to work on their 8-bit pixel artwork and publish their work when they have finished.
Licence:
Unless otherwise specified, everything in this repository is covered by the following licence:

TouchDevelop "8-bit Challenge" lesson is licenced under a Creative Commons Attribution 4.0 International License.
